
Diablo 4 Paladin Oaths Guide: Maximize Your Build Potential

Diablo 4 introduces the Paladin class with its iconic Oath system, a core mechanic that defines how your character functions in combat. Much like other class-defining mechanics-such as Enchantments, Rune Powers, or Sorcerer Masteries-choosing the right Paladin Oath can drastically influence your effectiveness in both PvE and PvP encounters. Selecting the wrong Oath for your build may leave your Paladin underpowered, unable to fully utilize its unique skill synergies, or struggling to keep up with endgame content.

This guide will break down each Paladin Oath, explain which builds they pair best with, and provide actionable tips to optimize your Paladin play experience.

What Are Paladin Oaths in Diablo 4?

Once a Paladin reaches level 30, they can select an Oath. Each Oath corresponds to a unique set of abilities and passive bonuses, shaping your gameplay style and enhancing specific builds. The four available Oaths are:

·Zealot Oath – Enhances Zealot Skills, stacking Fervor with each hit. When Fervor is fully charged, it grants temporary Fortify, boosting survivability. This Oath is ideal for Zealadin builds, focused on high-speed melee bursts and rapid kills.

·Juggernaut Oath – Consumes Resolve stacks to increase skill damage and area size. This Oath is perfect for Shield of Retribution or Shield Charge builds, emphasizing defensive melee combat and battlefield control.

·Judicator Oath – Adds Judgement effects to Basic Skills, increasing damage enemies take and detonating with Core Judicator Skills. Works best for pure Judgement builds or high-burst AoE setups in dungeons or elite-heavy areas.

·Disciple Oath – Grants Arbiter form, replacing Evade with Angelic Leap and enabling Wing Strike. This flexible Oath synergizes with builds like Brandish, Wing Strikes, Blessed Hammer, or Auradin, providing high mobility, damage, and utility.

Each Oath enhances specific abilities and builds. Choosing the correct Oath ensures maximum damage output, survivability, and synergy with your other skills.

Choosing the Right Oath for Your Build

Zealot Oath – Zealadin, Divine Lance

The Zealot Oath focuses on aggressive melee combos and critical strike chaining. Each Zealot Skill cast grants Fervor for 4 seconds, increasing both damage output and granting Fortify when fully stacked.

·Best Builds: Zealadin, Divine Lance Paladins

·Playstyle: Fast-paced melee bursts, strong survivability in solo or group content

·Synergy Tip: Equip gear that boosts Zealot Skills to maximize Fervor uptime and critical strike chaining.

Juggernaut Oath – Shield of Retribution, Shield Charge

The Juggernaut Oath turns defensive mechanics into offensive tools. Using 8 stacks of Resolve triggers damage boosts and increased skill area, perfect for shield-based builds.

·Best Builds: Shield of Retribution Paladins, Shield Charge builds

·Playstyle: Tanky frontline control, high sustain, consistent pressure on enemies

·Synergy Tip: Combine with defensive gear and cooldown-reducing Diablo 4 Items to maintain uptime on skills while soaking damage.

Judicator Oath – Judgement Builds

The Judicator Oath converts Basic Skills into Judgement triggers, detonating additional damage over small areas and amplifying Core Judicator Skills.

·Best Builds: Pure Judgement Paladins, AoE-heavy dungeon builds

·Playstyle: Crowd control and AoE damage, optimal for high-density enemy zones

·Synergy Tip: Stack Lucky Hit Chance or gear that boosts Judgement damage to increase total output. Diablo 4 Items that amplify skill effects are highly recommended.

Disciple Oath – Wing Strikes, Brandish, Blessed Hammer

The Disciple Oath is the most flexible. It grants Arbiter form, replacing Evade with Angelic Leap, and unlocks Wing Strike bonuses.

·Best Builds: Brandish, Auradin, Blessed Hammer Paladins

·Playstyle: High mobility, strong AoE, versatile in group content

·Synergy Tip: Combine with Diablo 4 Items that increase Arbiter form effectiveness, cooldown reduction, and hybrid damage for optimal performance.

Optimizing Your Paladin Oath Experience

1. Switch Oaths Freely – Diablo 4 allows you to change Oaths at any time, so don’t hesitate to experiment with builds and skills.

2. Enhance Gear Synergy – Equip Diablo 4 Items that complement your chosen Oath. For example, Zealot Oath builds benefit most from gear boosting Zealot Skills or critical damage.

3. Buy or Trade for Essentials – Struggling to find rare items? You can safely buy Diablo IV Items from reliable sources or trade materials with other players to speed up gearing.

4. Experiment with Hybrid Builds – Builds as Disciple Oath Wing Strikes excel with mobility and hybrid damage, so mix gear and skills to maximize Arbiter form potential.

5. Level Up Gradually – Focus on Paladin Skills that synergize with your Oath. This reduces downtime in dungeons, Helltides, or open-world farming while maximizing combat efficiency.

Final Thoughts

Paladin Oaths in Diablo 4 are game-changing mechanics that dictate your playstyle and effectiveness. Selecting the right Oath for your build can maximize damage, survivability, and utility, whether you are running Nightmare Dungeons, Torment bosses, or open-world content.

·Zealot Oath for fast melee bursts

·Juggernaut Oath for defensive frontline builds

·Judicator Oath for Judgement-based AoE builds

·Disciple Oath for flexible Arbiter-focused setups

Pairing the right Oath with optimized Diablo 4 Items, efficient farming, and strategic skill upgrades ensures your Paladin will thrive in Season 11 endgame content. Experiment, refine your gear, and explore every Oath to find the build that best suits your playstyle.

Path of Exile 3.27:Earthshatter Juggernaut Explained

The Earthshatter Juggernaut has returned as one of the most robust and beginner-friendly melee builds in Path of Exile 3.27. Combining devastating damage, near-impenetrable defense, and effortless playstyle, this build is perfect for newcomers and returning players looking for a reliable league starter. Expect smooth leveling, fast map clears, and survivability that makes even endgame bosses manageable.

Earthshatter, one of PoE most iconic Slam skills, truly shines when paired with Warcries like Rallying Cry, Enduring Cry, and Intimidating Cry. These abilities not only boost your damage but also trigger Earthshatter’s spikes to explode, dealing massive area-of-effect damage.

By using Autoexertion Support, your Warcries automatically activate during combat, keeping your explosions consistent. Slightly adjusting Warcry qualities can stagger their cooldowns, ensuring at least one is ready with every swing of Earthshatter. This synergy creates a smooth, semi-automated rhythm of slams and spikes that’s both satisfying and devastating from early gameplay to late bosses.Don’t let currency shortages hold you back—get your POE currency on MMOexp now and thrive!

Skill Rotation

Clearing Packs:

1.Leap Slam or Frostblink into enemy groups.

Tip:Cancel Leap Slam’s landing animation by casting Frostblink mid-air for faster movement.

2.Cast Earthshatter to crush enemies and spawn spikes.

3.Let Autoexertion Warcries detonate spikes automatically.
If needed, manually use Rallying Cry to guarantee explosions.

4.Keep Blood Rage active every 5–6 seconds to maintain frenzy charges and attack speed.

Single Target / Bossing:

1.Apply Vulnerability Curse to increase physical damage taken.

2.Place War Banner for improved accuracy and damage.

3.Use Rallying Cry to exert attacks.

4.Cast Earthshatter 2–3 times to stack spikes on the boss.

5.Detonate spikes with Warcries and repeat until the boss is defeated.

Boss fights are tactical yet explosive, rewarding players who maintain rhythm and uptime.

Leveling Guide

Starting as a melee build can be challenging without the right skills. The recommended path:

Early Game:Use Sunder for reliable AoE damage and smooth progression.

Transition:Switch to Earthshatter once you acquire your first support gems and Warcries.

Gear Priorities

Weapon:

Two-Handed Axe or Mace with high physical DPS.

Focus on % Increased Physical Damage, Attack Speed, and Critical Strike Chance.

Armor & Helmet:

Prioritize Life, Armor, and Resistances.

Look for +1 Level to AoE Gems or Increased Area of Effect if available.

Jewelry:

Rings and amulets with Added Physical Damage to Attacks, Strength, and Resistances.

Flasks:

Granite and Basalt for defense.

Life Flask with bleed removal.

Quicksilver Flask for mobility.

Jewels:

Focus on Increased Warcry Effect, Attack Damage, and Physical Damage.

Even budget rares perform well, making this build accessible. If crafting isn’t your style, buying buy POE currency from a trusted source like MMOexp can help you scale into endgame content with minimal hassle.

Strengths and Weaknesses

Strengths:

1.High Physical Damage:Earthshatter spikes deal repeated AoE damage.

2.Exceptional Survivability:Juggernaut offers high armor, endurance charges, and stun/slow immunity.

3.Beginner-Friendly:Smooth progression with low gear dependency.

4.Automated Warcries:Reduces button spam for comfortable gameplay.

5.Flexible Scaling:Works with cheap rares or powerful crafted weapons.

Weaknesses:

1.Lower Peak DPS than Berserker:Juggernaut favors consistency over raw output.

2.Close-Range Combat:Must engage enemies directly.

3.Cooldown Management:Misaligned Warcries can temporarily disrupt your damage rhythm.

Why Play Earthshatter Juggernaut in 3.27?

Patch 3.27 has reinforced Earthshatter’s status as one of PoE’s most satisfying melee skills. Paired with Juggernaut’s defensive prowess, this build dominates early leagues, clears maps efficiently, and handles bosses with ease—all while remaining budget-friendly.

Whether you’re leveling, farming currency, or enjoying visceral slam combat, the Earthshatter Juggernaut offers a perfect mix of power, survivability, and simplicity. Start strong, maintain momentum, and crush everything in your path.

How to Build the Strongest MPC-25 Loadout in Call of Duty: Black Ops 7

Call of Duty: Black Ops 7 has one of the most robust weapon sandboxes in series history, offering players an enormous supply of guns, attachments, tuning options, and class setups to experiment with. Among the many standout SMGs in BO7, the MPC-25 has quickly risen to the top of the Multiplayer meta thanks to its elite mobility, extremely high damage output, and unmatched hip-fire accuracy.

If you enjoy fast, aggressive playstyles, you prefer melting enemies before they can react, MPC-25 is absolutely worth grinding for. Below is the strongest MPC-25 loadout in Black Ops 7, including a complete breakdown of the weapon’s strengths, recommended attachments, Gunfighter optimizations, and the specific advantages this build provides.

Why the MPC-25 Is One of the Best SMGs in Black Ops 7

You won’t unlock the MPC-25 until Level 55 unless you spend a Permanent Unlock Token, but once you equip it, the advantages are immediately obvious. Among the SMG lineup, very few guns offer the same balance of speed, stopping power, and mid-range versatility.

Here’s why the MPC-25 stands out:

1. High Damage Output

The MPC-25 hits extremely second-highest raw damage per shot in its class-allowing it to outgun even hybrid AR-SMGs in close-to-mid range engagements.

2. Surprisingly Strong Mid-Range Lethality

While most SMGs fall off sharply outside 15-20 meters, the MPC-25 maintains impressive damage past 23 meters, making it competitive even on larger maps.

3. Best Hip-Fire Accuracy in Its Class

You can win many fights without ever aiming down sights. Its base hip-fire accuracy beats every other BO7 SMG.

4. Elite Mobility & Handling

The MPC-25 has top-tier sprint speed, ADS speed, jump-to-fire responsiveness, and overall movement fluidity-making it deadly in aggressive, high-pressure situations.

With the right attachments, this SMG becomes even stronger. Now let’s build it properly.

Best MPC-25 Loadout in Call of Duty: Black Ops 7

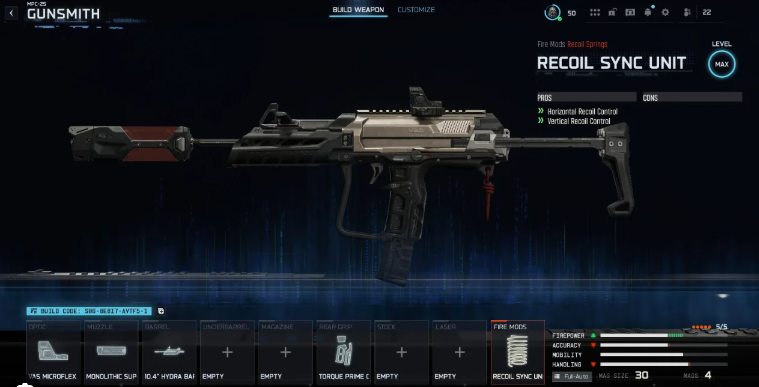
This optimized MPC-25 setup maximizes recoil control, mobility, and headshot consistency-allowing you to shred enemies in both close-quarters and mid-range engagements.

Best MPC-25 Loadout (Meta 5-Attachment Build)

Loadout Code: S06-8ZCMD-ZI351

·Muzzle: K&S Stalker 57-X

·Barrel: 8.6″ MFS Stratus-X Barrel

·Underbarrel: Quickstep Foregrip

·Magazine: Sustain-25 Extended Mag

·Laser: EMT3 Agile Laser

Why This Build Works

This configuration enhances every strength the MPC-25 already has-speed, accuracy, and handling-while fixing its only real weakness: recoil at mid-range. The Extended Mag provides enough ammo for multi-kills, while the Agile Laser and Quickstep Foregrip drastically reduce your time-to-kill in aggressive gunfights.

Optional Gunfighter Attachments (Highly Recommended)

If you use the Gunfighter Wildcard, add these attachments to maximize performance:

·Rear Grip: Photonic Adaptive Grip

·Stock: Viper Wire Stock

·Fire Mods: Recoil Sync Unit

These elevate mobility, strafe speed, ADS stability, and recoil syncing-turning the MPC-25 into a true competitive-tier SMG.

Why This MPC-25 Loadout Is So Strong

The most important attachment in this build is the 8.6″ MFS Stratus-X Barrel, which is one of the best barrels in the entire SMG category. Unlike many headshot-oriented barrels that increase recoil, this one actually:

·Reduces vertical recoil

·Reduces horizontal recoil

·Improves burst and auto stability

·Boosts the headshot multiplier

The tradeoff is a slight loss of body-shot damage range, but the accuracy improvements easily make up for it-especially if you consistently land upper-torso hits.

The Laser, Underbarrel, and Stock options give you faster strafe speed, slide-to-fire, jump-to-fire, and ADS-while-moving critical advantages in aggressive gameplay or when leveling weapons quickly in Call of Duty Black Ops 7 Bot Lobbies.

MPC-25 Loadout Benefits (Stat & Gameplay Improvements)

Stealth & Damage

·No firing ping on enemy minimaps

·Stronger headshot damage

·Improved mid-range consistency

Recoil Control & Accuracy

·Reduced vertical recoil

·Reduced horizontal recoil

·Better recoil stabilization

·Extremely tight hip-fire spread

Mobility & Handling (Major Improvements)

·Faster ADS speed

·Faster jump-to-fire

·Better slide-to-fire and dive-to-fire

·Faster aim-walking

·Faster sprint movement

·Better strafe speed

·Faster hip-fire movement

Sustained Firepower

·An extended magazine for multi-kills

·More consistent recoil over long engagements

·Perfect for OBJ game modes and fast-paced maps

How to Play the MPC-25 in Black Ops 7 Multiplayer

This loadout is built for aggressive slayers who rely on speed and precision. Here’s how to get the most out of it:

1. Stay Mobile-Always

Take advantage of your boosted strafe, sprint, and ADS movement. Constant movement makes you nearly impossible to track.

2. Aim for the Upper Torso or Head

With the Stratus-X barrel, headshots dramatically reduce your time-to-kill.

3. Abuse Hip-Fire in Close Quarters

You have the best hip-fire SMG in the game-use it to dominate hallways, corners, and chokepoints.

4. Fight at 5-20 Meters When Possible

The MPC-25 excels in this range. Beyond 25 meters, switch to controlled bursts or use cover to close the distance.

To master recoil patterns or rapidly level the weapon, many players choose to buy CoD Black Ops 7 Bot Lobbies, letting them test attachments and improve mechanical consistency in a low-pressure environment.

Final Thoughts

The MPC-25 (previously beloved as the MSMC) has returned explosively for Black Ops 7. It’s fast, accurate, and hits like a truck-all while offering some of the best mobility of any SMG in the game.

Path of Exile 2 Guide:How to Beat Captain Hartlin in Act Four

Path of Exile 2 continues Grinding Gear Games tradition of brutal, high-stakes boss fights that demand mastery of your build, reflexes, and strategy. One of the standout challenges in Act Four is Captain Hartlin, a tragic figure cursed into an undead monstrosity fused with shipwrecked weaponry and dark magic.

During the Dark Mists questline, Freya Hartlin sends you to search for her missing son across the fog-shrouded waters of Kedge Bay. When you finally find him at Journey Edge, the reunion comes too late-Hartlin has been consumed by corruption, his body melded with the relics of a ghostly vessel. What follows is a grim, cinematic battle that tests everything you’ve learned so far.

The Arena and General Strategy

The encounter unfolds in a wide, open arena at Journey Edge, where environmental hazards and Hartlin sweeping area attacks leave little room for error. Positioning and timing are critical here-standing still for even a second too long can cost you the fight.

Melee characters will find Hartlin especially punishing due to his high physical resistance, so armor-piercing or bleed-based skills are essential. Casters, on the other hand, have a smoother time since Hartlin is weaker to elemental damage, particularly fire and lightning. If you’re struggling, investing POE 2 Currency to upgrade your skill gems, weapons, and flasks can make a dramatic difference.

The Wheel Mechanic Explained

Captain Hartlin most distinctive feature is the captain wheel fused to his chest, adorned with glowing skulls. At any point, the top skull glows Purple, Green, or Blue, signaling his next special attack type. Periodically, Hartlin spins the wheel, randomly shifting his attack mode and forcing players to react quickly.

Purple (Arcane Burst)-Releases waves of spectral energy that explode after a delay.

Green (Anchor Drop)-Slams his anchor into the ground, creating shockwaves in a large cone.

Blue (Sea Grasp)-Summons ghostly hands from the ground that pull players toward him.

Learning to read and react to these color cues is key to surviving the encounter.

Other Attacks and Final Phase

Beyond the wheel mechanic, Hartlin relies on a blend of devastating nautical abilities:

Anchor Swing:A slow but wide-reaching melee sweep that can one-shot unprepared players.

Cannon Blast:Fires a quick, explosive projectile from the cannon attached to his body-easily dodgeable if you stay alert.

Once Hartlin’s health drops below 33%, he enters his final phase and shouts:

“Fire in the hole!”

This triggers a bombardment sequence where spectral cannons surround the arena and rain down explosive shots. The best strategy is to stay near the center and circle tightly to bait cannonballs into missing-panic dashing can get you trapped by overlapping explosions.

Strategy Tips

Prioritize Magic Damage-Fire, lightning, or chaos spells shred through his armor much faster than physical attacks.

Control the Adds-Hartlin occasionally summons skeletons; use AoE or crowd-control abilities to keep them in check.

Capitalize on Anchor Drop-When he slams the ground (Green mode), he pauses briefly-use this to unload your cooldowns.

Keep Moving-His attacks are slow but far-reaching; constant motion prevents getting cornered or clipped.

Save Mobility Skills for “Fire in the Hole”-Blink, dash, or evade skills can help reposition safely during the cannon phase.

Rewards and Quest Progression

Defeating Captain Hartlin grants typical mid-act rewards, including:

Verisium, a quest item required to continue the Dark Mists storyline.

Rare gear with strong modifiers, ideal for midgame progression.

Currency items, offering a small restock before the next Act Four challenges.Don’t let currency shortages hold you back-acquire your Path of Exile 2 Currency for sale now at MMOexp and thrive!

While he doesn’t drop exclusive unique items, the guaranteed quest advancement and solid loot make this a fight worth mastering.

Beyond his loot, Hartlin serves as a mechanical milestone in Path of Exile 2. His color-coded wheel introduces visual telegraphs, his summons test crowd-control readiness, and his final phase pushes spatial awareness and mobility.

Defeating Captain Hartlin isn’t just about advancing the story-it’s proof that your build, reflexes, and decision-making are ready for Path of Exile 2 escalating midgame trials. Though not the most complex boss, his thematic design, tragic lore, and punishing mechanics make him an unforgettable highlight of Act Four.

Path of Exile 2: Top Invoker Setup for Lightning Melee Combat

In Path of Exile 2, few monsters stand out as much as Frozen Mandibles, one of the most powerful and versatile beast-type enemies in the game. Known for its lethal mix of damage, durability, and blinding speed, Frozen Mandibles is more than just another rare monster-it’s a top-tier companion choice for summoner builds using Tame Beast or Bind Specter.

For players who love experimenting with summoner archetypes, farming Frozen Mandibles is one of the smartest long-term investments you can make. Whether your goal is to acquire aura-boosted allies or collect elite Path of Exile 2 Items, this guide explains exactly where to find Frozen Mandibles, how to farm them efficiently, and why they’re among the best companions in Path of Exile 2.

Why Frozen Mandibles Is One of the Best Beasts in Path of Exile 2

Frozen Mandibles isn’t just another high-level enemy-it’s a true endgame asset for summoner-style builds. Its design makes it an excellent hybrid of power and utility, offering benefits that rival some of the rarest pets in the game.

Here’s what makes it stand out:

·Elite Combat Strength: Frozen Mandibles hits hard and tanks well, giving it excellent survivability even in elite encounters.

·Exceptional Speed: Unlike many companion monsters that struggle to keep up, it can sprint alongside your character seamlessly.

·Aura Synergy: The creature can roll powerful aura modifiers like Haste Aura, turning it into one of the strongest “aura-bot” beasts in Path of Exile 2.

·Dual Compatibility: It’s perfectly suited for both Tame Beast (recruiting) and Bind Specter (reviving), giving summoners flexibility across multiple build types.

Players running hybrid summoner builds, aura stacking, or minion-heavy compositions will find Frozen Mandibles an irreplaceable companion for scaling both offense and defense.

Where to Find Frozen Mandibles in Path of Exile 2

The Frozen Mandibles spawns exclusively in the Ashen Forest, a large, icy zone accessible during the Interludes section of the campaign. It’s not a random event-you can reliably find it every time as long as you know where to look.

Step-by-Step Location Guide:

1. Progress through the campaign until you’ve completed Act 4.

2. Use the world map to travel to Mount Kriar.

3. From there, head north to reach the Ashen Forest entrance.

4. Explore the map and activate each checkpoint along the way until you reach the fifth and final one-this is where the Frozen Mandibles spawn is guaranteed.

Frozen Mandibles Checkpoint Locations

Each Ashen Forest instance contains five checkpoints, and the Frozen Mandibles consistently appear near the fifth checkpoint. While the overall layout may vary due to procedural generation, the general structure remains similar each time:

·Checkpoint 1: Near the Glade entrance.

·Checkpoint 2: By the exit leading to Kriar Village.

·Checkpoint 3: Beside an Ancient Monument point of interest.

·Checkpoint 4: Close to a spider pit in one of the corner regions.

·Checkpoint 5: The Frozen Mandibles spawn point, guaranteed in every instance.

At the fifth checkpoint, look for a distinctive rare monster with icy claws and shimmering armor-your Frozen Mandibles target. The modifiers will vary from spawn to spawn, which is where farming efficiency comes in.

How to Farm Frozen Mandibles in Path of Exile 2

If you’re looking for a specific variant-especially one with Haste Aura or synergistic affixes-expect to spend a bit of time farming. Thankfully, Path of Exile 2’s checkpoint system makes rerolling simple.

Efficient Farming Method:

1. Reach the fifth checkpoint in Ashen Forest.

2. Locate the Frozen Mandibles and inspect their rodifiers before engaging.

3. If it doesn’t have the desired mods, activate the nearby checkpoint.

4. Pause the game and select “Respawn at Checkpoint.”

5. The map will reload, spawning a new Frozen Mandibles with randomized modifiers.

6. Repeat this process until you find the perfect one for your setup.

Important Notes:

·If you kill the Frozen Mandibles, it will not respawn using checkpoint resets. To continue farming, you must generate a new Ashen Forest instance.

·The Frozen Mandibles always appear alongside another rare monster. Eliminate the other rare for faster resets.

·Having optimized gear can make farming much smoother-don’t hesitate to buy POE2 Items or upgrade your build using Path of Exile 2 Currency before starting this process.

This method minimizes RNG frustration and helps you secure an ideal Frozen Mandibles variant without wasting time recreating entire zones.

Why Frozen Mandibles Is Perfect for Tame Beast and Bind Spectre

Both Tame Beast and Bind Spectre players benefit greatly from this monster, though in slightly different ways:

·For Tame Beast Users: Frozen Mandibles make for an incredibly strong companion. With the right aura modifiers, it can drastically boost your clear speed and survivability. Its ability to keep up with your sprinting pace ensures it never falls behind in combat.

·For Bind Spectre Users: When revived as a spectre, Frozen Mandibles retains its core traits, dealing significant damage while supporting your army. Its aura buffs stack beautifully with other spectres, making it an essential pick for hybrid summoner builds.

No other beast in Path of Exile 2 matches Frozen Mandibles’ combination of mobility, aura potential, and raw combat power-it’s effectively the gold standard for summoner-style gameplay.

Final Thoughts

The Frozen Mandibles isn’t just a high-tier beast-it’s a core component of advanced summoner builds in Path of Exile 2. Its consistent spawn in Ashen Forest makes it accessible to all players, while the checkpoint farming system ensures you can efficiently reroll for the perfect version.

For summoners, the payoff is immense. Whether you’re chasing the Haste Aura or seeking a loyal beast that keeps pace with your character, the Frozen Mandibles is one of the best investments you can make. Its synergy with Tame Beast and Bind Spectre transforms it from a simple enemy into a long-term asset for your build.

If you’re serious about mastering summoner mechanics in Path of Exile 2, make the Ashen Forest part of your regular farming route. And remember – upgrading your arsenal through Path of Exile 2 Currency trades or choosing to buy POE2 Items can greatly enhance your efficiency when farming and commanding this formidable ally.

The Frozen Mandibles is not just a beast-it’s a statement of summoner mastery, power, and precision in Path of Exile 2.